Getting Down to Business
Use NetInfo Manager to Define a Dummy Print Center Printer
Next, we need to use NetInfo Manager (shown below) to define a printer for use in the Mac OS Print Center. This will be a dummy printer in the respect that you’ll go through the actions of printing to it in the Mac OS, but this printer won’t represent a real device; it will, however, generate the PostScript that we need.
Start up the program “NetInfo Manager” in Mac OS. Be sure to “Click the lock to make changes.” A standard Mac OS authentication panel will ask you to authenticate yourself with an administrator name and password.
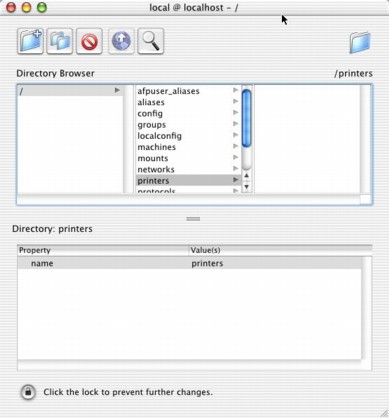
As you can see, the top portion of the NetInfo Manager is similar to the column view in the Finder. The left-most column will merely be /, indicating your current, local computer. Paths in NetInfo are analogous to paths in the Finder. As such, find and select the path /Printers, as shown in Figure 1 to the left. The printer we’re going to add will be in this NetInfo “directory.”
Let’s create the printer now. From the Directory menu, choose New Subdirectory. In the /Printers directory you should see new_directory. This will be our NetInfo printer that we’ll later add to the Print Center.
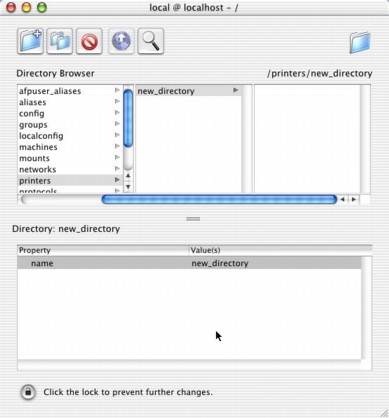
Now we want to add “properties” to this directory. Select new_directory, and you’ll notice in the lower pane that the property name already exists, with the value new_directory. You can edit property names and/or values by double-clicking them, and then editing them the normal, Macintosh way. If you change the property value of name, for example, you’ll see that the directory name /Printers/new_directory changes to the new name you’ve assigned (after saving your changes, that is).
To create a new property, make sure the lower pane (the properties) is focused (selected for input), and choose New Property in the Directory menu.
Add and edit properties for this printer so that it has all of the properties and values shown in the table below. Note that they’re all case sensitive, but the top-to-bottom order is of no particular importance.
| Printer Definition for your new_directory | |
| name | ghostscript |
| sd | /var/spool/lpd/ghostscript |
| lo | lock |
| lp | /dev/null |
| ppdurl | /usr/local/lib/lpd/GhostScript.ppd |
| if | /usr/local/lib/lpd/lpd.filter |
You’ll notice that when you assign the name property and save your work, the “file” name in the upper pane changes to the name property that you’ve set, such that if you use the name I’ve provided, you’ll have this NetInfo path: /Printers/ghostscript
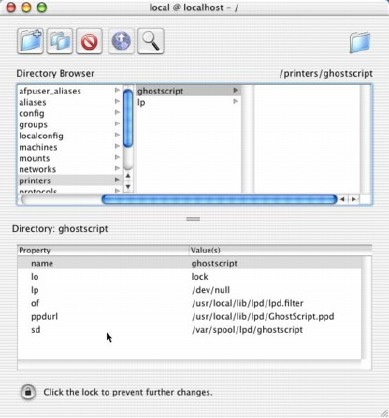
You can see a complete example of the definition for the printer ghostscript in NetInfo at Figure 3, left.
From now on, I’ll refer to this printer as ghostscript. The printer ghostscript will be the printer we add to Print Center; it will be the virtual printer that you go through the motions of printing to in Mac OS X, and will show up in the Print Center as ghostscript. You may not want to call your printer ghostscript, especially if you’d prefer something a little more descriptive. Feel free to use the name you prefer instead. If you do change the name, you should use the same name the same for both the sd and the name properties, though. Also, be aware that in the rest of this article, I will continue referring to the name and sd as ghostscript, so do your own conversion if you change the name. Also, if you use your own name, avoid the use of spaces or punctuation, and you’re probably better off if you keep everything lower-case.
If you want to know what these properties mean, type man printcap from a terminal window. Note that while we’re not using printcap, the same properties apply (Darwin uses NetInfo instead of printcap and a lot of other /etc files). Here are some of the highlights, though (some of these didn’t appear in the table above, but will appear in the next section):
| Selected printcap entry descriptions | |
| sd | The spool directory where BSD puts temporary files waiting for processing. |
| lo | The name of lock file according to the printcap man page. I have no idea what this is for. |
| name | Name of printer. This name will be used by both the Print Center and the LPD system. |
| of | The path to the output filter, which is a list (script) of Unix commands that we’re going to perform on the PostScript before sending it to a printer. |
| ppdurl | The location (url) of the PostScript Printer Definition (PPD) for this printer. Later in one of the advanced topics, you’ll learn how to procure a custom PPD for your non-Postscript printer. |
| lp | The device name to open for output. In this case, the “real” output will be dumped into nothing. |
| rm | The remote machine, which is the IP address of the network printer or print server. |
Don’t forget to save your work in NetInfo Manager, if necessary.
Note: since the latest release of this Guide, I’ve changed to using an of output filter instead of an if input filter. If you know the difference and want to use if instead of of, go for it. This change was made to make the setup of printer hosting and USB file sharing easier, since if has bugs and causes multiple copies when printed from remote machines.