Advanced Topics
Hosting a Printer for Easy Setup
If you have more than one computer to setup for your unsupported network printer, you can easily follow the same instructions you followed for the first computer to get the rest of your computers running. Or, you can follow the instructions in this section to have a host computer do all of the hard work, and make setting up all of your other computers as easy as adding a “supported” computer.
Note: of course, the “host” computer will act as a print server, and as such will have to be turned on any time you wish to print from another computer.
Principles
We’ve already done the work of setting up a RIP – a raster i mage processor – on one machine. This was Ghostscript, which converts Postscript into a printer language, or raster image. We also already know that Mac OS X is perfectly happy generating Postscript code, without any special setup. And finally, of course, the Mac OS is a model network citizen, being based on a network operating system. We can combine all of these attributes to make non-supported printer setup that much easier on your other systems.
What we will do:
- Allow a computer you’ve already setup according to this guide to accept and process remote printing requests from other computers, including Mac OS X, pre-Mac OS X, and Windows systems, and probably any system that can print GhostScript via LPR.
- Setup the other computers to print to this host computer using a Postscript printer driver.
Identify Other Computers (Part One)
First we need to setup the NetInfo database so that it understands who the remote machines are. We’re going to define a name to go with each machine. Of course, if all of your machines are on DNS on your LAN, than you can probably safely skip this step.
Use this example NetInfo Manager screenshot to add your remote machines, i.e., machines that you want to give permission to print to the host.
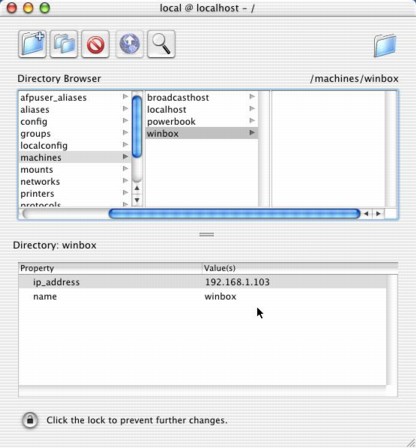
As you can see, we’re in NetInfo’s /machines path. The only properties that you need are a name for each remote machine, as well as the machine’s IP address. The example shows my WinXP box at 192.168.1.103 being known locally as winbox.
Note: if you’re on a DHCP server without a DNS system, there’s a possibility that every time you power cycle your computers, they will have a different IP address. Honestly, though, this shouldn’t be a big concern, since the DHCP specification indicates the IP address “leases” should always be renewed to the previous IP address if at all possible. In my home network of 5 devices, for example, none of the machines have ever changed IP addresses on me.
Note: if you’re on a DNS system, you don’t need to do this step, because your host will use the local DNS system to learn who the other machines are.
Note: once you’ve set this up, you can use the name of the other machines anywhere in the Mac OS instead of the IP address. Try ping winbox in the terminal, for example.
Identify Other Computers (Part Two)
Next, we need to give the LPD system permission to accept jobs from the other machines that we’ve just identified. In the terminal, make sure you sudo to root, and type
pico /etc/hosts.lpd
If you’ve decided to use the official LPRIOM.plugin file, you’re already familiar with this step. Simply type the machine names that you’ve put into NetInfo, e.g.:
	localhost
	powerbook
	winbox
This example gives the machines called localhost, powerbook, and winbox permission to print on the host machine.
Now may be a good time to restart the computer to make sure that the LPD system properly restarts, although if you want to restart it manually, do as root:
	/usr/libexec/lpd -l
	lpc restart ghostscript
Of course, this assumes that you want the ghostscript queue to be the one responsible for handling the incoming requests.
Note: adding IP addresses to the /etc/hosts.lpd file should work, but it doesn’t seem to in my case. That’s why we have the extra step of adding machine names to /machines.
Setup the Other Computers to Print to the Host
From your other Mac OS X computers, use the Print Center and choose Add Printer. Make sure you select the LPR Printers using IP option, and follow this example:

The printer address is the IP address of the printer host. If you have DNS or have setup a /machines entry in NetInfo for the host computer, you can use that name instead of the IP address if you wish.
Make sure you do not use the default queue on the server; instead, you want to use the name of the print queue that will handle the Postscript-to-printer-language conversion. If you’ve followed the recommendations in this guide, that will be ghostscript.
The Results
Print from the remote machine. You should eventually have some output.
Here’s a summary of what happens:
- You print via Postscript from a remote machine to a properly-configured host machine.
- The host machine’s print queue processes its output filter, which converts the Postscript using Ghostscript.
- This is passed back to the network to the network printer.
- You’ve done the “hard work” of configuring Ghostscript on but a single computer; you’ve very easily printed from another computer without doing any special work at all.