Getting Down to Business
Use NetInfo Manager to Define our “lp” Printer
AppleTalk Users: Skip these steps; you don’t need them.
If you have to use TCP/IP to communicate with your printer, then we need to define a second printer in NetInfo manager. This second printer will be a “Unix only” printer, and we need to setup the parameters that the Unix LPD (Line Printer Daemon) system needs in order to deliver the processed print job to the real, physical printer on your network. Users who will be using AppleTalk to communicate with their printers can skip this step, because these printers aren’t accessed in BSD by the LPD system.
Using your knowledge from the previous section, use NetInfo Manager to build a new printer called lp, and configure it to match the property name and values in the table below. Note again that everything is case sensitive, but the top-to-bottom order doesn’t matter.
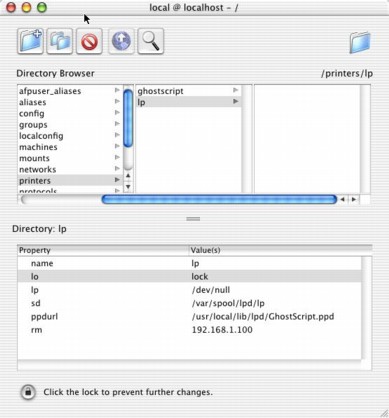
| Printer Definition for your new_directory | |
| name | lp |
| sd | /var/spool/lpd/lp |
| lo | lock |
| lp | /dev/null |
| ppdurl | /usr/local/lib/lpd/GhostScript.ppd |
| rm | 192.168.1.100 |
This time, rather than choosing your own creative name, you’re probably better off just leaving the name lp.
Now, for this printer lp, you’ll notice the rm line contains an IP address. The IP address of my printer will likely not work on your own network, so you’ll have to put in the appropriate IP address for your own printer.
Below you can find a reference of the NetInfo Manager with lp printer definition added.